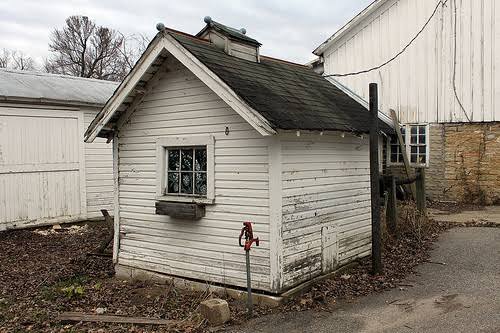
A well house is a small structure built over or beside a private water well to keep the well head, pressure tank, pump controls and pipework dry, secure, clean and above freezing, while leaving everything reachable for service. This guide covers how to build one from the ground up: the size you need, the foundation, framing, roof, insulation and heating that suit a climate with real winters, what it costs in 2026, the permit and well rules that apply, and the design ideas that make a utility building look like it belongs on the property.
How to Build a Well House: the Short Version
- Measure the well head and every piece of equipment it will shelter, then add working room on all sides.
- Set a frost-proof foundation: a concrete pad on gravel, footings below the frost line, or concrete piers for a small cover.
- Frame the walls from pressure-treated lumber, with the door on the side a technician will approach.
- Sheathe and side the walls, then add a sloped roof with a removable section above the casing so a pump can be pulled.
- Insulate the walls, ceiling and any exposed pipe, and add a thermostat-controlled heater if winters drop below freezing.
- Vent it, wire it with a light and an outlet on a dedicated circuit, and fit a lockable door.
- Grade the ground away from the building and keep fuel, fertilizer and chemicals out of it for good.
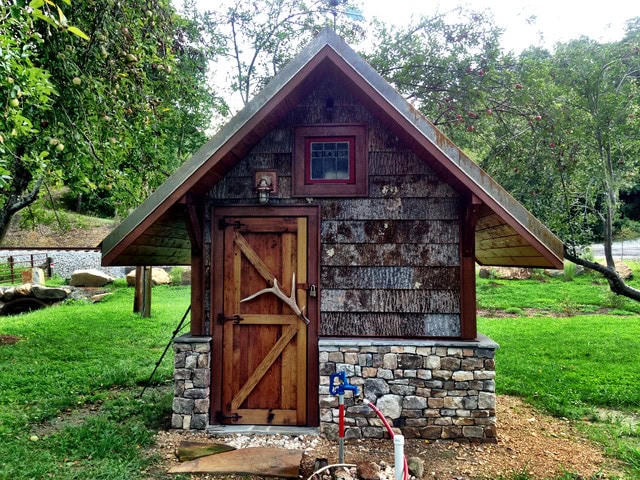
Done properly, a well house adds years to a pump and pressure tank, ends the winter worry about a frozen line, and hides the least attractive equipment on the property inside something that can look like a garden shed, a miniature barn or a stone outbuilding. The sections below take each step in order.
What Is a Well House?
A well house, also called a pump house, is the shelter for a private well’s above-ground components. Depending on how the well was plumbed, that can be as little as the casing and cap, or as much as the pressure tank, pressure switch, control box, water treatment equipment and the pipe runs that connect them.
- Well casing and cap, the steel or PVC pipe that rises from the ground with a sealed cap on top
- Pitless adapter, the fitting below frost depth that turns the water line toward the house
- Pressure tank, the steel cylinder that stores water under air pressure so the pump does not cycle constantly
- Pressure switch and control box, which start and stop the pump
- Water treatment, such as a softener, sediment filter, UV unit or acid neutralizer
- Wiring for the pump, the switch, lighting and any heater
Most homes built since the 1970s use a pitless adapter and keep the pressure tank and controls in the basement or garage. On those properties a well house only has to cover the casing and keep the cap area frost-free and secure. Older properties, farm wells and homes where the tank sits outside need the larger, insulated, heated version this guide is mostly about. Work out which you have before you draw anything, because the two buildings are different sizes and different budgets. If the well serves a house you also plan to add on to, a home on well and septic in Loudoun County needs Health Department sign off before a bedroom can be added, and our home additions in Northern Virginia page covers that and the rest of the permit path.
Why Build a Well House?
- Freeze protection. A pressure tank or an exposed pipe that freezes can split, and a pump that runs against a frozen line burns out. One insulated, heated building removes the risk.
- Weather protection. Rain, ice and sun shorten the life of switches, wiring, tank bladders and treatment equipment left outdoors.
- Security. A locked building keeps children, animals and anyone else away from the electrical controls and the well cap.
- Contamination control. A well head that is covered, above grade and away from runoff is far less likely to draw surface water into the aquifer.
- Easier service. A lit, dry room with the equipment at working height turns a filter change or a pressure switch replacement into a ten minute job.
- Appearance. A tank, a control box and a pipe stub in the lawn look like a utility yard. A well house can look like part of the landscape design.
What Size Well House Do You Need?
Size is the decision people get wrong most often, almost always by building too small. The equipment you have today is not the equipment you will have in ten years, and the technician who replaces the pressure switch needs room to stand, kneel and swing a wrench. Measure the tank, the treatment equipment and the casing, then use the table as a floor, not a ceiling.
| Interior size | What fits | Typical use |
|---|---|---|
| 4 by 4 feet | Casing, cap and a heat source | Pitless well with the tank indoors; a frost-proof cover with a hatch or removable roof |
| 6 by 6 feet | Casing plus a 20 to 44 gallon pressure tank, switch and control box | The most common full well house for a single family home |
| 8 by 8 feet | Casing, a tank up to 86 gallons, a softener or filter and standing room | Homes with water treatment, or wells that serve a house and a barn |
| 8 by 10 feet or larger | Everything above plus storage and a workbench | Rural properties, horse farms, wells with multiple tanks |
Interior height matters as much as floor area. Pressure tanks stand two to five feet tall, a technician needs to lean over them, and a removable roof section is easier to build on a wall that is at least six feet high. A 36 inch door is the practical minimum, because an 86 gallon tank will not pass through a 30 inch opening.
Before You Start
Building Codes and Permits
In Virginia, a detached accessory structure of 256 square feet or less does not need a building permit under the statewide building code, and every well house in the table above is well under that. Three other rules still apply. Zoning setbacks from the property line apply to accessory structures in every county, so check the distance for your district before you pour a pad. Electrical work needs an electrical permit and an inspection regardless of the building’s size. And if you live in a community with a homeowners association, any exterior structure goes to the architectural review committee before it goes up. Our Northern Virginia permit checklist covers who to call in each county.
Well Regulations
The well itself is regulated by the state health department’s private well rules, administered locally by the county health department. Two of those rules shape a well house. The casing must end at least 12 inches above the finished ground level, so the floor of the well house cannot bury the casing and the slab must be set below the top of it. And the well must remain accessible for inspection, repair and, one day, abandonment, which is why a building sealed over the casing with no way to pull the pump is a mistake that costs money the first time the pump fails. Never store fuel, pesticides, fertilizer, paint or solvents inside a well house; a spill there goes straight toward your drinking water.
Measure Your Equipment
Write down the tank diameter and height, the footprint of any treatment equipment, the location of the pressure switch and control box, and where the water line and power come in. Then add 24 inches of clear space on the service side of the tank and 18 inches everywhere else. If a water softener is a possibility in the future, plan its space now.
Climate
Anywhere that sees a hard freeze needs an insulated well house with a heat source and a foundation that will not heave. Northern Virginia sits in USDA zone 7a, with winter lows in the teens and the occasional single-digit night, which is enough to freeze an unprotected pressure tank in a few hours. Warm-climate builds can skip the heater and use lighter construction, but ventilation matters more there because heat and humidity shorten the life of the switch and the control box.
Well Houses in Northern Virginia: Where Wells Are and What the Climate Demands
A large share of the properties we remodel outside the water and sewer service areas are on private wells: Great Falls, Clifton, Fairfax Station and the larger lots of Oakton in Fairfax County, and most of western Loudoun, from Round Hill, Purcellville and Hamilton to Middleburg, Lovettsville and the farms in between. Prince William’s rural crescent is the same. Our Fairfax County remodeling guide and Loudoun County remodeling guide both cover how a well and a septic system shape a larger project; the well house is the small building that protects the well end of it.
Three local conditions drive the design. The frost line here is 24 inches in most of the region, so any footing that is meant to be permanent goes to that depth, and a slab-on-gravel build needs a thickened edge and good drainage to stay put. Summers are humid, so the building needs cross ventilation or it will grow condensation on the tank and mold on the framing. And the region’s soil is heavy clay that holds water, which means grading the ground away from the building and keeping the slab above the surrounding grade is not optional. A well house that sits in a low spot fills with water in a March thaw.
Design expectations run with the property. In Great Falls and Clifton a well house is usually asked to look like the other outbuildings, board and batten or stone with a real roof, and stone from our exterior house stone guide is the usual answer. In western Loudoun the barn-inspired and farmhouse versions below fit the landscape. In an HOA community with a well, which is rarer but exists in parts of Fairfax Station and around Purcellville, the committee will want the siding and roof to match the house.
Popular Well House Ideas
Rustic Cabin Style
A miniature log cabin or a cedar-sided shed with a metal roof, decorative shutters and a stone base. It suits wooded lots, and the cedar and stone both age well without maintenance.
Farmhouse Well House
White board-and-batten siding, a black standing seam roof, a wooden door and a window box. This is the version that photographs best beside a modern farmhouse, and the board-and-batten hides the vent openings neatly.
Modern Well House
Horizontal siding, black trim, a single-slope shed roof in standing seam metal and no ornament at all. The shed roof is also the easiest style to make removable over the casing.
Stone Well House
A masonry base of fieldstone or ledgestone with a framed upper section, or full stone walls on the larger builds. The most expensive option and the one that needs the least attention afterward. On estate lots it is the design that holds value.
Garden Cottage Style
Painted siding, a small window, flower beds and climbing vines. Keep the plantings a few feet back from the walls so the siding can dry, and keep tree roots well away from the water line.
Barn-Inspired Design
Red or dark siding, white trim, a sliding barn door and a cupola. The cupola is not only decorative; a vented cupola is one of the best ways to move humid air out of a well house in a Virginia summer.
Small Utility Shed
Plywood walls, asphalt shingles, a single door and basic vents. The cheapest build and a perfectly good one when the well house sits out of sight.
Choosing the Best Location
- Cover the casing completely, with the casing at least 12 inches above the finished floor
- Leave a clear approach for a service truck; a pump rig needs to park close and work above the casing
- Build above any flood level and on ground that drains away from the well
- Keep it reachable in winter, ideally near a plowed drive or a path
- Keep large trees and their roots away from the buried water line and the electrical run
- Keep it away from the septic drainfield, the driveway runoff and anywhere chemicals are stored
Materials You Will Need
| Component | Common choices | Notes |
|---|---|---|
| Foundation | Gravel base; concrete pad; concrete blocks or piers | A pad on 4 inches of compacted gravel is the standard for a full well house |
| Framing | Pressure-treated 2 by 4 and 2 by 6 lumber | Treated bottom plates always; treated studs where the walls meet masonry |
| Sheathing and siding | Plywood or OSB; fiber cement, vinyl, cedar or board-and-batten siding | Fiber cement is the low-maintenance choice in a humid climate |
| Roofing | Standing seam or corrugated metal; asphalt shingles; cedar shakes | Metal sheds snow and lasts longest |
| Insulation | Rigid foam board; fiberglass batts; spray foam | Foam board on the walls, foam or batts in the ceiling, foam on the floor edge |
| Door | Exterior-grade wood, steel or composite, 36 inches wide | Weather stripping and a keyed lock |
| Ventilation | Gable vents, soffit vents, a vented cupola, louvered wall vents | Screened against insects and rodents |
| Electrical | Weatherproof light, GFCI outlet, dedicated circuit, thermostat-controlled heater | An electrician and an electrical permit |
| Hardware | Hinges, lock, vent screens, exterior screws, flashing, sealant | Stainless or coated fasteners |
Step-by-Step Guide to Building a Well House
Step 1: Plan Your Design
Sketch the floor plan with the casing marked, the tank and controls placed, and the door on the service side. Decide the roof style now, because the removable section over the casing determines how the rafters are framed. Mark where the water line and the electrical conduit enter so the framing leaves them clear.
Step 2: Prepare the Site
Strip the sod, level the area to slightly above the surrounding grade, and lay four inches of compacted gravel that extends a foot beyond the walls. Water must run away from the building in every direction.
Step 3: Build the Foundation
A four inch concrete pad with a thickened edge is the durable choice for a full well house, poured with a sleeve or a boxed-out opening around the casing so the slab never touches it. Concrete piers or blocks work for a small casing cover. In a freezing climate either take footings to frost depth or accept that a floating slab needs a well-drained gravel base to avoid heaving.
Step 4: Frame the Walls
Frame four walls from treated lumber on 16 inch centers, six to eight feet tall, with rough openings for the door, the vents and the electrical panel or switch. Anchor the bottom plates to the slab with anchor bolts or masonry screws. Frame a header over the door and blocking where the tank straps or shelving will attach.
Step 5: Install the Roof
Gable, shed, hip and gambrel roofs all work; the shed roof is simplest and the gable looks most like a house. Build the section directly above the casing as a removable panel or a hinged hatch large enough to lower a pump and pipe string through, and flash it so it sheds water like the rest of the roof. Metal roofing outlasts shingles and sheds snow on its own.
Step 6: Add Siding
Sheathe the walls, wrap them, and side them with a material that tolerates moisture. Paint or stain to match the house, and keep the bottom edge of the siding an inch or two above the slab so it can dry.
Step 7: Install Insulation
Insulate walls and ceiling in any climate that freezes, seal every gap around penetrations with foam, and insulate the rim of the slab with foam board so the cold does not travel in under the floor. Cover exposed pipe and the pressure tank with pipe insulation or a tank jacket.
Step 8: Add Ventilation
Fit at least two screened vents on opposite walls, or soffit vents with a gable or cupola vent, so air moves through. In winter, close or damper the vents while the heater runs; in summer, open them. A building with no airflow grows condensation on the tank and mold on the framing.
Step 9: Install the Door
Hang a 36 inch exterior door with weather stripping and a keyed lock, opening outward so nothing inside blocks it. Confirm the largest piece of equipment will pass through it before the frame is nailed off.
Step 10: Finish the Interior
Have an electrician run a dedicated circuit for a light, a GFCI outlet and the heater, and label the pump disconnect. Add shelving for filters, hang the well record and the pump paperwork in a sleeve on the wall, and put a thermometer where you can read it from the door.
Freeze Protection That Works Through a Virginia Winter
A well house that freezes once is a failed well house, so the winter plan deserves its own section. Start with the envelope: foam board on the walls, insulation in the ceiling, the slab edge insulated and every penetration sealed. Then add heat. A small thermostat-controlled electric heater rated 250 to 1,500 watts, set to hold about 40 degrees, is the standard, and in an insulated 6 by 6 building it runs for a few minutes an hour on the coldest nights. Heat tape with its own thermostat goes on any pipe that runs along an exterior wall, and a tank jacket goes on the pressure tank.
Two additions are cheap and worth it. A wireless thermometer that alerts your phone when the building drops below 38 degrees catches a tripped breaker before the pipes do. And a second, simpler heat source, such as a thermostatic heat cable wrapped around the tank tee, covers the night the heater fails. Never use an open-flame heater, and never let a heater sit against the wall, the tank or anything stored inside.
Pump Access: the Detail Most Well Houses Get Wrong
A submersible pump hangs from a pipe that may be 200 to 600 feet long in Northern Virginia’s bedrock wells, and replacing it means a pump hoist or a rig standing directly over the casing and lifting the whole string straight up. If the roof and ceiling are fixed, the well contractor has to cut them open or take the building apart. Build the roof section above the casing to lift off, leave the ceiling open below it, keep the tank and treatment equipment to the sides rather than over the casing, and leave the approach clear enough for a truck. Ask the company that services your well how they pull pumps before you finalize the roof.
Best Roofing Materials
Metal Roof
Standing seam or corrugated metal lasts 40 years or more, sheds snow and ice, and is the easiest material to build a removable section into. The trade-off is cost, and metal needs underlayment to stop condensation dripping inside.
Asphalt Shingles
The cheapest and quickest to install, and they match most houses. They last 15 to 25 years and are harder to make removable, so pair them with a hinged hatch rather than a lift-off panel.
Cedar Shakes
The best-looking option on a rustic or cottage build. They need cleaning and treating every few years in a humid climate and cost more than shingles.
Insulation Tips
- Foam board on the inside of the wall framing gives the most insulation per inch and shrugs off moisture
- Fiberglass batts work in the ceiling if the roof space is vented; foam if it is not
- Spray foam seals and insulates in one pass and is the choice for a small casing cover
- Insulate the slab edge, the door and any exposed pipe and the tank itself
- Do not insulate over the vents; damper them instead
Heating Options
- A thermostat-controlled electric heater, 250 to 1,500 watts, wall mounted and clear of everything
- Self-regulating heat tape on exposed pipe and the tank tee
- A heat lamp on a thermostat as a backup for a small cover, kept well away from anything flammable
- A remote thermometer with a low-temperature alert
Decorative Well House Ideas
- Stone veneer on the lower third of the walls
- Window boxes and shutters on a farmhouse or cottage build
- A vented cupola, which is also useful
- Cedar trim, a lantern beside the door and a gravel path
- Climbing roses or clematis on a trellis set a foot off the wall
- Siding and roofing matched to the house so the building reads as part of the property
Our guide to connecting indoor and outdoor spaces covers the landscaping principles that make an outbuilding feel planned rather than parked.
Budget-Friendly Well House Ideas
- A shed roof instead of a gable saves framing and roofing
- Corrugated metal roofing over purlins is cheap and lasts
- Concrete blocks or piers instead of a pad for a small casing cover
- Vinyl siding over plywood sheathing
- Reclaimed lumber and a salvaged door
- Doing the carpentry yourself and paying only for the electrical work
How Much Does It Cost to Build a Well House?
Two tables. The first is the all-in range by type of build; the second breaks a standard insulated 6 by 6 well house into its parts, so you can see where a DIY build saves and where it does not.
| Type of well house | Cost range | What is included |
|---|---|---|
| Small DIY casing cover | $500 to $1,200 | Piers or blocks, framed cover, roof, insulation, heat tape |
| Standard wood well house | $1,200 to $2,500 | Pad, framed 6 by 6 building, siding, roof, door, vents |
| Insulated and heated well house | $2,000 to $4,000 | The standard build plus insulation, heater, electrical circuit |
| Premium custom design | $4,000 to $8,000 and up | Stone or matched siding, standing seam roof, larger size, treatment space |
| Line item, insulated 6 by 6 | Materials | With labor |
|---|---|---|
| Gravel base and concrete pad | $250 to $500 | $600 to $1,200 |
| Treated framing lumber | $200 to $500 | $500 to $1,000 |
| Sheathing, wrap and siding | $300 to $900 | $700 to $1,800 |
| Metal roofing and flashing | $200 to $600 | $500 to $1,200 |
| Insulation and sealant | $100 to $400 | $250 to $700 |
| Door, lock and hardware | $150 to $500 | $300 to $800 |
| Electrical circuit, light, outlet, heater | $150 to $400 | $500 to $1,400 |
| Vents, screens and paint | $80 to $250 | $150 to $450 |
Materials for the standard insulated build land around $1,500 to $4,000 in the Mid-Atlantic in 2026, and hiring a carpenter and an electrician roughly doubles it. Stone, a matched roof and treatment equipment push the premium builds past $8,000. These are regional retail figures and move with lumber and steel prices, so confirm them at the supplier before you set a budget.
Common Mistakes to Avoid
- Building too small for the tank, the technician or the next piece of equipment
- Sealing the roof over the casing so the pump cannot be pulled
- Burying the casing in the floor or setting the slab above its top
- Skipping ventilation, which fills the building with condensation
- Skipping insulation or the heater in a climate that freezes
- Untreated lumber on the slab or against masonry
- A floor lower than the surrounding grade, or grading that runs toward the building
- No electrical permit, and heaters on extension cords
- Storing fuel, chemicals or fertilizer inside
- Planting trees over the water line
Maintenance Checklist
Inspect twice a year, once before the first freeze and once in spring.
- Roof, flashing and the removable section for leaks
- Cracks in the slab and gaps in the siding
- Insects, rodents and nests in the vents
- Moisture, condensation or mold on the tank and framing
- Pipe joints, the pressure switch and the tank for drips or rust
- Insulation that has slipped or been chewed
- The heater and thermostat, tested before winter
- Weather stripping, the lock and the door swing
Landscaping Around Your Well House
- A gravel border a foot wide against the walls keeps splash and mulch off the siding
- Native shrubs and perennials set back from the walls and off the water line
- Decorative stone or a stepping stone path to the door
- Low-voltage or solar lighting at the door
- No trees within the root spread of the buried line or the drainfield
Frequently Asked Questions
How big should a well house be?
Most well houses run from 4 by 4 feet for a casing cover to 8 by 8 feet for a building that holds the pressure tank and treatment equipment. Size it to the equipment plus 24 inches of working room on the service side, and use a 36 inch door.
Does a well house need insulation?
Yes wherever winters freeze. Insulate the walls, ceiling and slab edge, wrap exposed pipe and the tank, and add a thermostat-controlled heater. In Northern Virginia’s zone 7a winters an uninsulated well house will freeze.
Can I build a well house myself?
Yes. A homeowner with basic carpentry skills can build the pad, frame, roof and siding of a small well house in a weekend or two. Hire an electrician for the circuit, the light and the heater, and pull the electrical permit.
What is the best material for a well house?
Pressure-treated lumber for the frame, fiber cement or vinyl siding for the walls and metal for the roof give the longest life with the least maintenance. Stone is the premium choice for the base or the whole building.
Does a well house need ventilation?
Yes. Two screened vents on opposite walls, or soffit vents with a gable or cupola vent, keep condensation and mold off the tank and framing. Close or damper them in winter while the heater runs.
How much does it cost to build a well house?
A basic DIY casing cover costs $500 to $1,200. A standard wood well house runs $1,200 to $2,500, an insulated and heated one $2,000 to $4,000, and a premium stone or matched design $4,000 to $8,000 or more in 2026.
Do I need a permit to build a well house in Fairfax or Loudoun County?
Not a building permit, because a detached accessory structure of 256 square feet or less is exempt under Virginia’s building code. You do need an electrical permit for the wiring, you must respect zoning setbacks, and an HOA will want to approve the exterior.
Can a well house be built directly over the well head?
Yes, and most are, as long as the casing stays at least 12 inches above the finished floor and the roof section above it can be removed so the pump can be pulled. Keep the tank and equipment to the sides of the casing, not over it.
How do I keep the pipes in a well house from freezing?
Insulate the building, seal the gaps, put self-regulating heat tape on exposed pipe and a jacket on the tank, and run a thermostat-controlled heater set around 40 degrees. A remote thermometer that alerts your phone catches a failure before the pipes freeze.
Final Thoughts
A well house is a small building with one job: keep the water running through the coldest week of the year and make the equipment easy to reach the day something fails. Size it for the next pump and the next tank, set it on a foundation that will not move, insulate and heat it, vent it, and build the roof so it comes off above the casing. Do that, and the design on the outside can be whatever suits the property, from a plywood shed to a stone cottage.
If the well house is part of a larger project on a Northern Virginia property, from an outbuilding to an addition on a lot with a well and septic, we are a Class A licensed design-build firm in Sterling and the in-home design consultation is free. Book a free in-home design consultation.